Showing posts with label General Cards. Show all posts

Thursday, June 14, 2012

3D Stamped Card/Project Tutorial


Good Evening Everyone,

My name is Fiona from feeleedesigns.blogspot.com.au I have recently been given the pleasure of contributing to Inspirational. To start off I am posting a tutorial I did for a 3D stamped project that I completed.

This tutorial gives you a step by step guide on creating 3D stamped images for your cards or projects. For this particular piece I have used a La La Land stamp Kitty Kat Marci.

STEP ONE:  You will need to stamp your image a number of times. For this project I have stamped my image four times in total.  (Three stamps I used to colour for my pop up areas and these will be cut up and the last stamped image I used for the base of my stamp). If you are using digital stamps then print your image a number of times.  To begin with you will need to colour the areas on your stamp that you wish to raise and have popped up, these areas will all be cut out.  This is shown in the photograph below.


For my first areas I have coloured the hat, top and skirt on Marci.


For my second areas I have coloured the ears and crosses on Marci's Hat, the details on her shirt, shoes and the flowers centre.
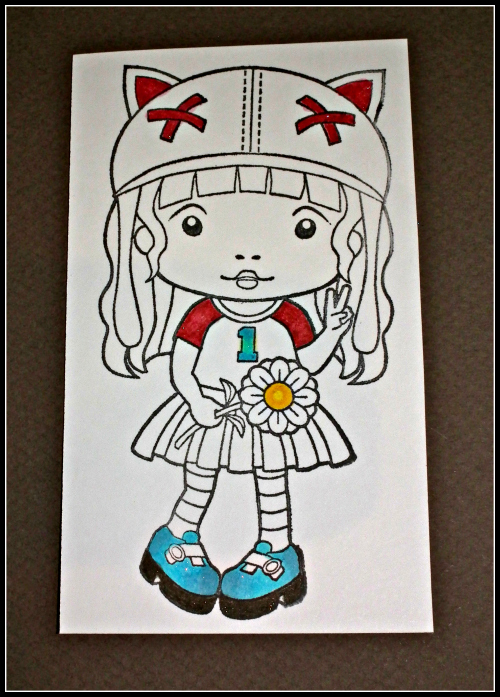

For the final area to be raised on my stamp I have coloured the flower.


STEP TWO: Once you have coloured each area that you wish to raise you then need to cut them out. This is a little time consuming however it is absolutely worth it as the end result looks wonderful. You can either fussy cut with scissors or you may like to use a craft knife. I prefer the scissors, however it is personal preference.


STEP THREE:  For the base of the image which is the fourth image stamped you then need to colour the rest of Marci these areas are what will remain flat and will be the base for which you will stick the pop up pieces. So in this case I coloured her hair, face and her stockings.  You will notice that I have then coloured all the other areas black.  This is the base for my pop up areas. I have coloured them black as it gives a more finished and professional look when the image is all finished.


This is a close up look of your main completed base stamp of Marci and how it should look just before you are ready to assemble and stick all your raised coloured sections on.


This is what you should start with when ready to stick all your pieces together. To complete your project each cut out coloured area is then stuck on your main completed stamp. 


This is Marci all stuck together. I find zots glue dots the best option for this project. However you can use what you have available. Any 3D glue or sticky dots will work fine.


A close up view of Marci raised. I have cut her out completely to finish the stamp off nicely.


STEP FOUR: Its now time to assemble your completed project on card stock or whatever you wish.  I have chosen to do a sweet little note book for my daughter.


For my completed project I have chosen a blue, red and lemon colour scheme. I have sewn my papers together and used red, white and lemon flowers, blue satin ribbon, pearl accents, a smile embellishment and red brads to complete the notebook!


Thank you for taking the time to share my tutorial. I hope you like it!  This is particularly fun to do and the end result is so cute! If you like what you see if you could please take the time to leave a comment on my blog that would be wonderful! Have a great weekend and I hope you stop by soon.


xxx
Hugs

Fiona xxx

Monday, August 31, 2009

Spooky Mummy Card

I'm not a big fan of Halloween cards.  But this one was too cute not to show you.  I've had some of you wonder where my quilling tutorials are.  Well, I will be on vacation from September 2nd to September 19th and then I will start the quilling tutorials and videos then.  In the mean time don't forget to check my other tutorials on the top links.
I have to tell you this as we don't know what we are gonna do.  We are taking a 2 week road trip through California and Nevada.  We are scheduled to stay in Yosemite for 2 days.  They have huge fires going on there and our Hotel where we are scheduled to stay just got evacuated.  This trip ought to be a real adventure now!  Good luck and prayers to the people in California.  So sorry to go on and on, here's your tutorial, enjoy!
 
In the mean time don't forget to check my other tutorials on my Blog.  Thanks for watching!  Monica

Friday, April 17, 2009

EASY CARD FOR A MAN

A nice, easy monochrome image - men are always difficult to stamp for, and I think are often frightened of colour!

This card works well for birthdays, anniversarys (I made it for Father's Day last year - and my poor husband will probably be given it again this year, lol).


With Love
copyright Susie Jefferson at 1stFloorFlat and BladeRubberStamps

How I did it:
  • I used just one inkpad throughout: Brilliance ink in Starlite Black.
  • The background is the huge trefoil stamp (stamped twice onto white card) from the Weathered Textiles sheet by Tim Holtz.
  • The main image is Classic Couple from Stampsmith (also stamped onto white card) then torn round 3 of the edges and ink rubbed on straight from the pad.
  • I punched two holes at top and bottom left-hand side and threaded fibres through, then used double-sided tape to mount the piece to the background.
  • The text is made up from an unmounted ransom-style alphabet set.
I hope you enjoy my very first project for Inspirational!

post signature

Thursday, December 11, 2008


I have had many emails and requests for making embellishments for cards and scrapbooking layouts.. so in view of demand lol i will show you how to make a snowman family. It is slightly different from the earrings , and i have also made a tutorial of the holly and berries , i did have a little help from you know who too !

Now if i was to send a card with fimo on , i would definatly put it in a strong box for posting .. fimo is delicate and i wouldnt think it would survive being shoved through a letter box !
Also if you was to use it on a layout i would make sure nothing heavy goes onto of your scrapbook.


So here goes ! REMEMBER TO WASH YOUR HANDS BEFORE AND WHEN YOU CHANGE COLOURS.
1. roll a ball of white fimo
.

2. Roll this into a sausage shape .


3. Next we are going to cut the bodies and the heads , The first is the dad snowman body - cut roughly about 2 cms , then the head 1 1/2 cm . Mum - body 1 1/2 cm head 1cm , child snowman -body 1cm , head just alittle over 1/2 cm. These measurements are only a guide , so long as it looks in proportion , thats ok.


4. Keeping them in order- ie - dads body , dads head etc .. roll each one into a smooth round ball.


5. next we have to taper the ends of each body. Place the pad of your finger just on top but on the side of the ball and roll back and forth until the end looks like a tear shape.
Flattern this with your finger and then gently press the head onto the body - just use alittle of the taper end or he will look a bit neckless !

6. now we have all three snowmen , its time to add the hat . first roll a red ball of fimo , flattern slightly with the pad of your finger and cut in half. Place one half onto the top of the head - tap gently to secure. With the other half left over roll this back into a ball then into a tear shape (just like we did for the body ) Cut the end of point off and gently push onto the hat - tap to secure - and remember also it needs to be flat against your surface. This is shown on the picture as 1- ball, 2 - tear shape - 3 cut off point.


7.its time to add the scarf . first roll a small ball of white fimo and then asmall ball of red fimo . Roll each of these into a thin sausage shape . Pick up both ends with your thumb and index finger and lift up so it dangles . Using your other hand , twist the fimo from the bottom- becareful not to over twist as it will break off.


8. Cut off a small piece and wrap around the front of the snowmans neck.


9. cut two smaller pieces for the scarf. Then roll a very small ball of red and gently tap this onto the scarf join.Repeat for the other two snowmen.


10 , Using some orange fimo , roll into a ball , then a thin sausage shape. Cut out 3 tiny triangles for noses and using your knife to gently pick it up with, place on the face and tap gently.


11. For the mouth -Now take your straw and cut the end off at an angle - so it looks like a half moon shape. Test the shape on a piece of spare fimo , once your happy with the shape gently push into the face - you can position them with different smiles - ie at the side.


12 - The eyes- for the eyes i used a cocktail stick - gently push in and twist it as your taking it out .... hmmmmmm i appear to have lost mine ..........
WHERE IS IT MISTER ????

THANK YOU CALVIN MOUSE !

Right back to crafting !

13.Place your dad and mum snowmen together. gently tap the sides so they stick to each other.
Because there is a gap underneth the child it needs to be filled to keep it the same height as the other two. Roll a small ball of white fimo and place this just between the mum and the dad.

14. Now place the child ontop.
15. For the arms. - roll small sausage shapes and gently tap onto the sides. For dads hand around mum , roll a small tear shape and press gently over her shoulder .


Now all three are ready for baking . I bake on a tile or plate (not used for food) and bake as per instructions on the clay packet.
ONCE baked - leave to cool . On the video i show you how to make the holly and to make your snowmen look furry. Its not the best vid in the world lol but it gets alot clearer at the end.
.

There is a video on my blog http://madimaginations.blogspot.com/
on how to make the holly leaves and make your snowmen look furry !

love maddy

Tuesday, September 9, 2008

Christmas Advent House

As soon as I saw this little beauty complete with instructions and a template on Nichole Heady's blog I new it would be a project in the making for me.
My youngest Daughter Natalie is still at home with us and although she is 17 she still likes to have an advent calendar although she hides it out of sight not to look soft.
The house is a perfect alternative to hiding the advent Calendar what could be nicer than 25 of these little houses hanging from the Christmas tree & each one filled with a favorite chocolate and the doors numbered from 1 to 25.


As you can see I only glued down one side of the roof as I figured a Thornton's Chocolate would fit into the house just nicely.

1 down only another 24 to make.


To see more of Jaks creations visit her at http://crafterskitchen.blogspot.com/

Friday, August 8, 2008

Floral Punch Craft Card

A simple Flower card with a Tutorial

I was always admiring a flower FPC card made by my friend Pam and she kindly talked me through making the flower over the telephone, mind you I'm not really sure if I did it correctly but I liked the end result so I thought I would share it with you.

Leaf Stamps, ink & Ribbon by PTI

Tutorial - How to make the red Flowers


Tools used, Punch Bunch medium Flower, large ball tool, tweezers, scissors and fine scoring tool.


Punch the flower shape out of red paper.


Turn over the flower and score 2 more lines in either side of the middle line you have just scored. You should now have 5 scored lines in total for each petal.


Using a ball tool in a circular motionpush gently on the centre of the flower until the flower is a cupped shape.


Cut a piece of black paper into a rectangle roughly 3/4 " x 2" we will use this to make the centre of the flower.


Fold the rectangle in half to make a
thinner rectangle.


With your scissors cut little snips along the length of the folded paper from the open ends towards the folded edge about 2/3rds of the width of the paper, continue all the way to the end.


Once you have made all of the snips your folded paper will look like this.


Spread glue along the fold and nip the end of the paper in your tweezers, start to turn the tweezers towards the glue winding the snipped paper around the tweezers until you get to the end of the paper.


Once the flower centre is set, splay out the cut paper with your
fingers untill it forms a pom pom then remove it from the tweezers.


Add a wet glue to the center of your flower shape & add the pom pom quilled shape on top of it.


This is the finished flower I used 3 to make the card, I added some punched out leaf shapes to finish the arrangement.


*****
A note from Julie
Stunning card Jak and another brilliant tutorial!!
Head on over to Jak's wonderful Crafters Kitchen Blog for more inspirational creations