Showing posts with label 3-D gift. Show all posts

Thursday, June 14, 2012

3D Stamped Card/Project Tutorial


Good Evening Everyone,

My name is Fiona from feeleedesigns.blogspot.com.au I have recently been given the pleasure of contributing to Inspirational. To start off I am posting a tutorial I did for a 3D stamped project that I completed.

This tutorial gives you a step by step guide on creating 3D stamped images for your cards or projects. For this particular piece I have used a La La Land stamp Kitty Kat Marci.

STEP ONE:  You will need to stamp your image a number of times. For this project I have stamped my image four times in total.  (Three stamps I used to colour for my pop up areas and these will be cut up and the last stamped image I used for the base of my stamp). If you are using digital stamps then print your image a number of times.  To begin with you will need to colour the areas on your stamp that you wish to raise and have popped up, these areas will all be cut out.  This is shown in the photograph below.


For my first areas I have coloured the hat, top and skirt on Marci.


For my second areas I have coloured the ears and crosses on Marci's Hat, the details on her shirt, shoes and the flowers centre.
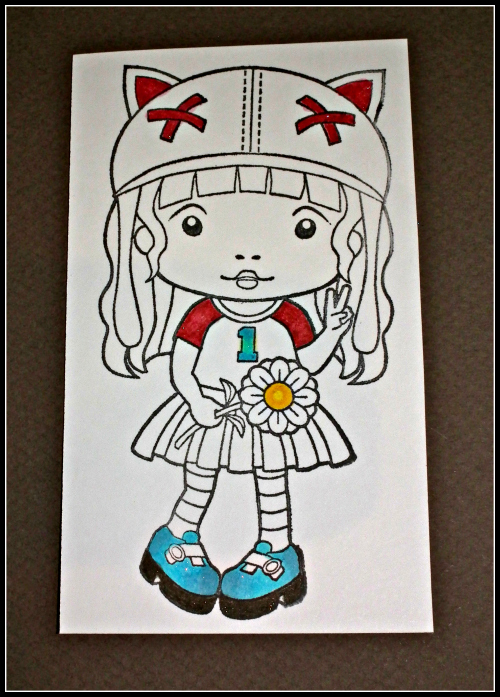

For the final area to be raised on my stamp I have coloured the flower.


STEP TWO: Once you have coloured each area that you wish to raise you then need to cut them out. This is a little time consuming however it is absolutely worth it as the end result looks wonderful. You can either fussy cut with scissors or you may like to use a craft knife. I prefer the scissors, however it is personal preference.


STEP THREE:  For the base of the image which is the fourth image stamped you then need to colour the rest of Marci these areas are what will remain flat and will be the base for which you will stick the pop up pieces. So in this case I coloured her hair, face and her stockings.  You will notice that I have then coloured all the other areas black.  This is the base for my pop up areas. I have coloured them black as it gives a more finished and professional look when the image is all finished.


This is a close up look of your main completed base stamp of Marci and how it should look just before you are ready to assemble and stick all your raised coloured sections on.


This is what you should start with when ready to stick all your pieces together. To complete your project each cut out coloured area is then stuck on your main completed stamp. 


This is Marci all stuck together. I find zots glue dots the best option for this project. However you can use what you have available. Any 3D glue or sticky dots will work fine.


A close up view of Marci raised. I have cut her out completely to finish the stamp off nicely.


STEP FOUR: Its now time to assemble your completed project on card stock or whatever you wish.  I have chosen to do a sweet little note book for my daughter.


For my completed project I have chosen a blue, red and lemon colour scheme. I have sewn my papers together and used red, white and lemon flowers, blue satin ribbon, pearl accents, a smile embellishment and red brads to complete the notebook!


Thank you for taking the time to share my tutorial. I hope you like it!  This is particularly fun to do and the end result is so cute! If you like what you see if you could please take the time to leave a comment on my blog that would be wonderful! Have a great weekend and I hope you stop by soon.


xxx
Hugs

Fiona xxx

Wednesday, April 20, 2011

Easy Paper Basket

I can't remember if I posted this tutorial last year but I thought I would post it again because Easter is Sunday and it's time to make baskets!


Make sure to visit me for other tutorials and fun too!

Thanks!  Monica

Thursday, August 12, 2010

Gift Bag Making

Today the lovely Arina from Arina's Card Corner has accepted to share with us her wonderful "Gift Bag Making Tutorial".  Here's how it goes:


Hi everyone here I am again with a post I saw yesterday on you tube a movie about how a bag can make an envelope.

So I thought to myself I'll also try to make an attempt to make the end I made two.

I have for you like a workshop, I explain step by step with pictures how to make the bag.
'm Curious what you think.

Workshop:
What you need an envelope, ribbon, designer paper, 2 brads, colored and afdrukjes.


Step 1: First glue the envelope shut, and then cut out of the sides about half an inch off.
 
Step 2:


then go on creasing 1.9 cm on both sides and the bottom is 2.5 cm.  Then you fold the crease lines here, but does so as well so you get a tight fold.


Step 3: then go on top briefly with a cartel scissors cut a piece off so you get a nice edge.
 
Step 4: Then you just run your hand into the bag and fold the crease lines on the sides and bottom and that should it look like.


Step 5: then make 2 holes on the sides of the ribbon, and then create the ribbon on your bag.


Step 6: Then decorate the front and back with the design paper, if you did go down the bottom flap so they stick.

And after you tie the ribbon around it, so the base of your bag ready and you can further decorate it yourself.

And below you see two of my creation programs I made.

1 it was made for a mother of a friend who is sick hyves.

You can do everything in, I've even made matching cards with which you have money, gift etc can put.


***************************
Arina has many other wonderful ideas over at -->her blog<-- that you might want to take a look at ;-)

Thursday, November 5, 2009

Dimensional Paper Piecing / Paper Tole

Kim, from Paper Babe, was thrilled to share with us her tutorial on making a dimensional paper piecing or paper tole.

Here's how it is done:

I start by stamping Ian on patterned paper, then two times onto plain stamping card stock (you will need to stamp an extra hand on a little scrap paper). Then the top half of Ian twice onto patterned paper. Now it's time to colour... the parts of Ian that will be seen and not covered by patterned paper I have coloured with my Copics. I have then very roughly coloured the edges for the parts of Ian that will be covered with patterned papers. In the picture I have tried to show the layers from left to right and how each layer will have a different element either coloured, paper pieced or cut away.

Now I apply dimensional adhesive foam to the back of each piece, I use a 1mm foam tape so the finished piece won't be too high and dense. On the hoody top I have applied a little glue to the shoulders to give a greater dimension to the waist.

So time for the fun part of applying each piece in place to create a completed dimensional Ian. If you have more time you could curve the paper pieces a little to add further dimension.

Also wanted to add that as I used Memento die ink on the patterned papers I can go in with my Copics to shade in the darker areas like under his chin and arms and hood.


For more on Kim's work, you can visit her blog by clicking -->here<--.

Wednesday, October 14, 2009

Tea Light Cake!

Supplies: Battery operated tea light (2 for $1.o0 at Dollar Store), SU Exclusive Flower Folds die, SU Afternoon Tea DP, punches from Martha Stewart and EK Success. Faux half-back pearls from Michaels, faux pearl string roll form Michaels.

This Tea Light cake is a super easy gift to make!! I always make a matching card to go with it. (To see a tutorial and photos of the matching card, please visit my blog at Everlasting Ink!!)

Hope you enjoy!

You will need a battery operated tea light, DP and any embellishment you want for your cake.

This tutorial is how I did the above cake with the materials I had on hand, but you can use ribbon, stickers, sequence, beads, all kinds of fun embellishments!

Wrap the tea light with your choice of DP, leaving about 1/8" border on top. Battery operated tea lights can vary in size, so just measure or eyeball the one you are going to use. You want to make sure there is an extra amount of DP around the top of the tea light.


Snip at even intervals all the way around the exposed perimeter of the DP.


Fold down the edges and glue to top of tea light.


Cut out the smallest flower of the Sizzix Flower Folds die (SU Exclusive). Punch a 1/4" hole in the middle, then use your craft night to slice random criss-cross marks across your hole.


Slip the die cut flower over the flame of the tea light. Adhere the "petals" down to the sides of your cake.


Choose tiny sized embellishments to add to your cake. I used my Martha Stewart Hydrangea punch (the 2 smallest petals) and an EK Success leaf punch. I then added mini brads to the centers of my flowers and glued them to the top of the cake with some punched leaf branches.


I then added half-back white pearls to the scallops on the side. I rimmed the bottom with a string of more white pearls from a roll of faux string pearls.


You can decorate your cakes in so many different ways!! These are seriously EASY and fun to make!! If you have any questions, please stop by my blog and leave me a comment! THANKS!!