Showing posts with label Vintage. Show all posts

Tuesday, December 18, 2012

Shabby Chic Lace Flower Tutorial

This is so easy, it practically makes itself.

Shabby Chic Lace Flowers are really hot at the moment so this is my tutorial pick for today. It's a video tutorial for a change. If you click the image you will see the video.


I was inspired to make this flower as www.craftfairy.co.uk is now stocking this fabulous pointed lace. I believe that it is leavers lace. That is the same type of lace as the one used on Kate Middleton's wedding dress.


Apart from the lace, you will need a needle and thread and a flower to put in the centre. Please see my video on making folded flowers to see how to make one for yourself.
Lots more tutorials on my own blog.


Wednesday, May 27, 2009

Slide Mount - ATC

Hi all.
I'm M. Carmen, from Spain, and this is my first contribution to this fabulous blog.
Hope you like what I do.
You're invited to visit me at "Hecho a mano"

I recently bought the book "Artists' Journals and Sketchbooks", by Lynne Perrella and among so much techniques and interesting projects, she shows how to alter a slide mount in very different ways.
I incorporated mine on an ATC and I'd like to show you how I did it.
Materials:
An old slide mount, including the film
Tissue paper or napkin
Mod podge or similar
Acrylic paints
A film sized image
Mulberry paper
Tim Holtz’s word keys or any other embellishment.
A Background stamp
Embossing powders and versamark

Take the film off the slide frame
Glue the frame with a mixture of Mod Podge and gold paint.


Put a layer of a napkin over it and continue glueing and painting over. Let it dry.


Glue the image over the film strip, letting the holes uncovered.


Stamp the background over a black cardstock and emboss it with clear powders.

Using the embossing resist technique, paint over the whole card with gold acrylic paint. Before it dries, rub smoothly over it with a damp piece of paper or cloth, so the image reveals the black background.

Mount the film strip over the slide frame
Tear a piece of mulberry paper and glue it to the cardstock.

Mount the slide over the mulberry paper and embellish it with a Tim Holtz's word key

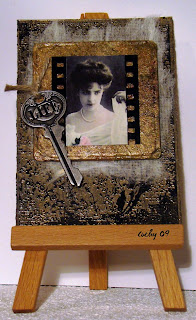
That's it! What do you think? Thank you for stopping by.

Monday, April 20, 2009

APRIL IN PARIS

Who remembers the songs "April in Paris" and "I love Paris in the Springtime"?

I don't know why, but there just seems to be something especially exotic and romantic about Paris... particularly at this time of year. Paris, the City of Lovers...

So here's my take on it.

THE POSTCARD:


Paris Postcard
Copyright Susie Jefferson


1stFloorFlat
& BladeRubberBlog


  • The stamped background postoid text and the Eiffel Tower are both from Tim Holtz's I See Paris sheet.
  • The postcard is a natural, flecked, handmade paper.
  • The background was stamped in Ranger Archival ink in Sepia, and the Eiffel Tower in Brilliance Graphite Black onto white linen-effect cardstock.
  • Tear round the Eiffel Tower image and colour it Direct-To-Paper style, using Versacolour pigment inks in Old Rose & Opera Pink, with a touch of Sky Blue.
  • The image is from a photo in my private collection. If she isn't French, then she certainly looks it!
  • Both Eiffel Tower and photo are layered over torn vintage French text from an old dictionary.
  • I used a clear alphabet to stamp out April in Paris, using Ranger's Sepia archival ink again, and drew over the letters by hand with a red glitter pen. I also coloured in the lady's lipstick with the red glitter pen.
  • Her cheeks were coloured with a cottonwool bud (carefully) with the Old Rose pigment ink.
  • Finally, I drew over the lips with Ranger's Glossy Accents, to really make the lipstick "pop".
THE TAG:


Paris Tag
Copyright Susie Jefferson


1stFloorFlat
& BladeRubberBlog


  • Crumple a manilla tag then smooth it out again. Do this a couple of times.
  • Swipe the tag with Distress ink in Mahogany and spritz a couple of times with clear water, so that the ink runs.
  • Allow to dry naturally, or hurry it up with a heat gun.
  • Flatten with an iron (on Dry setting) if you hate the creases.
  • Stamp the Eiffel Tower in Ranger Archival Sepia ink and tear around the image.
  • Use a cottonwool bud to tint the tower with a touch of Old Rose Versacolour ink.
  • Scuff round the torn edges of the image with Distress ink in Black Soot.
  • Stamp the alphabet as described above and draw over the letters with Glossy Accents.
  • Tint cheeks & lips as above.
Two easy-peasy and FAST projects for when you're in a hurry. These can both be done as a production run (I made around 20 postcards for a swap I was in). I like doing the tags to give away as bookmarks (you can never have too many bookmarks) and must have made around 10 or so of these as well.

If you'd like to know more about how to hand- tint your own photographs, click on this link to my Techniques page.

post signature

Friday, April 17, 2009

EASY CARD FOR A MAN

A nice, easy monochrome image - men are always difficult to stamp for, and I think are often frightened of colour!

This card works well for birthdays, anniversarys (I made it for Father's Day last year - and my poor husband will probably be given it again this year, lol).


With Love
copyright Susie Jefferson at 1stFloorFlat and BladeRubberStamps

How I did it:
  • I used just one inkpad throughout: Brilliance ink in Starlite Black.
  • The background is the huge trefoil stamp (stamped twice onto white card) from the Weathered Textiles sheet by Tim Holtz.
  • The main image is Classic Couple from Stampsmith (also stamped onto white card) then torn round 3 of the edges and ink rubbed on straight from the pad.
  • I punched two holes at top and bottom left-hand side and threaded fibres through, then used double-sided tape to mount the piece to the background.
  • The text is made up from an unmounted ransom-style alphabet set.
I hope you enjoy my very first project for Inspirational!

post signature