Good Evening Everyone,
My name is Fiona from feeleedesigns.blogspot.com.au I have recently been given the pleasure of contributing to Inspirational. To start off I am posting a tutorial I did for a 3D stamped project that I completed.
This tutorial gives you a step by step guide on creating 3D stamped images for your cards or projects. For this particular piece I have used a La La Land stamp Kitty Kat Marci.
This tutorial gives you a step by step guide on creating 3D stamped images for your cards or projects. For this particular piece I have used a La La Land stamp Kitty Kat Marci.
STEP ONE: You will need to stamp your image a number of times. For this project I have stamped my image four times in total. (Three stamps I used to colour for my pop up areas and these will be cut up and the last stamped image I used for the base of my stamp). If you are using digital stamps then print your image a number of times. To begin with you will need to colour the areas on your stamp that you wish to raise and have popped up, these areas will all be cut out. This is shown in the photograph below.

For my first areas I have coloured the hat, top and skirt on Marci.

For my second areas I have coloured the ears and crosses on Marci's Hat, the details on her shirt, shoes and the flowers centre.
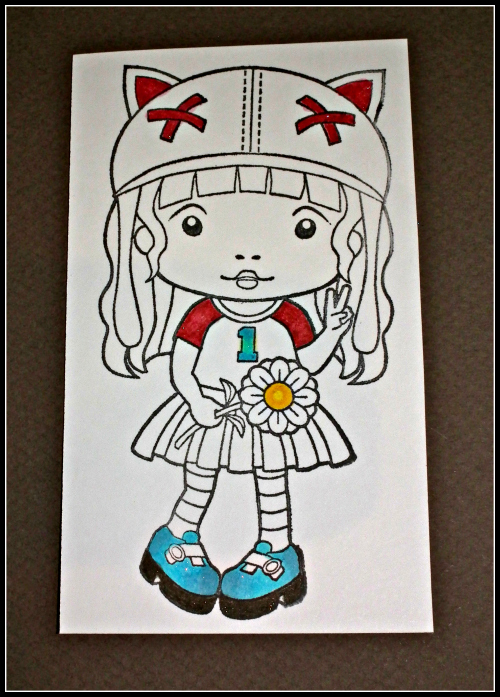
For the final area to be raised on my stamp I have coloured the flower.

STEP TWO: Once you have coloured each area that you wish to raise you then need to cut them out. This is a little time consuming however it is absolutely worth it as the end result looks wonderful. You can either fussy cut with scissors or you may like to use a craft knife. I prefer the scissors, however it is personal preference.

STEP THREE: For the base of the image which is the fourth image stamped you then need to colour the rest of Marci these areas are what will remain flat and will be the base for which you will stick the pop up pieces. So in this case I coloured her hair, face and her stockings. You will notice that I have then coloured all the other areas black. This is the base for my pop up areas. I have coloured them black as it gives a more finished and professional look when the image is all finished.

This is a close up look of your main completed base stamp of Marci and how it should look just before you are ready to assemble and stick all your raised coloured sections on.

This is what you should start with when ready to stick all your pieces together. To complete your project each cut out coloured area is then stuck on your main completed stamp.

This is Marci all stuck together. I find zots glue dots the best option for this project. However you can use what you have available. Any 3D glue or sticky dots will work fine.

A close up view of Marci raised. I have cut her out completely to finish the stamp off nicely.

STEP FOUR: Its now time to assemble your completed project on card stock or whatever you wish. I have chosen to do a sweet little note book for my daughter.


For my completed project I have chosen a blue, red and lemon colour scheme. I have sewn my papers together and used red, white and lemon flowers, blue satin ribbon, pearl accents, a smile embellishment and red brads to complete the notebook!

Thank you for taking the time to share my tutorial. I hope you like it! This is particularly fun to do and the end result is so cute! If you like what you see if you could please take the time to leave a comment on my blog that would be wonderful! Have a great weekend and I hope you stop by soon.
xxx
Hugs
Fiona xxx