Friday, May 29, 2009

DIY Snowflakes

Hello!I'm Jess and I'm a new contributor for Inspirational Tips,Techniques, and Tutorials.On this post I'll give you a link to an awesome video tutorial that shows you how to make beautiful paper snowflakes.And better yet, the snowflakes are super easy to make!
Click
here to see the video.You can also check out my blog at www.yourcraftblog.blogspot.com for more fun crafts.
Here's two that I made:

The one on the left was made with scrapbooking paper.The one on the right was made with regular white computer paper.Hope you enjoy this tutorial!

Wednesday, May 27, 2009

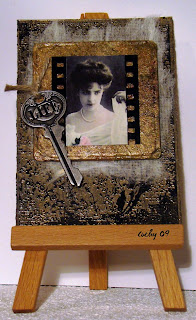
Slide Mount - ATC

Hi all.
I'm M. Carmen, from Spain, and this is my first contribution to this fabulous blog.
Hope you like what I do.
You're invited to visit me at "Hecho a mano"

I recently bought the book "Artists' Journals and Sketchbooks", by Lynne Perrella and among so much techniques and interesting projects, she shows how to alter a slide mount in very different ways.
I incorporated mine on an ATC and I'd like to show you how I did it.
Materials:
An old slide mount, including the film
Tissue paper or napkin
Mod podge or similar
Acrylic paints
A film sized image
Mulberry paper
Tim Holtz’s word keys or any other embellishment.
A Background stamp
Embossing powders and versamark

Take the film off the slide frame
Glue the frame with a mixture of Mod Podge and gold paint.


Put a layer of a napkin over it and continue glueing and painting over. Let it dry.


Glue the image over the film strip, letting the holes uncovered.


Stamp the background over a black cardstock and emboss it with clear powders.

Using the embossing resist technique, paint over the whole card with gold acrylic paint. Before it dries, rub smoothly over it with a damp piece of paper or cloth, so the image reveals the black background.

Mount the film strip over the slide frame
Tear a piece of mulberry paper and glue it to the cardstock.

Mount the slide over the mulberry paper and embellish it with a Tim Holtz's word key


That's it! What do you think? Thank you for stopping by.

Thursday, May 21, 2009

Quilling A Bee


Here's a tutorial on quilling a cute little bee to embellish your cards or scrapbook pages.
Thanks for watching!
Visit my BLOG for more tutorials too!

Wednesday, May 20, 2009

Wedding Cards

In this tutorial I have used the D'vine Swirl Folder and Heart Nesties to make a Wedding Day Card. These two were made for each other! So what else could I possibly use?

Materials used: A4 sheet of White Linen cardstock
Folder: D'vine Swirls
2 Heart Nestie Dies
Harmony Alphabet
Flowers, ribbon and beads

I first printed the words on A4 card - cut the card to 28 cms x 14 cms - scored a centre line and folded. I also scored lines just above the words.

The front of the card - the scored lines give a good edge to line the folder up to, and they just look like they should be there to finish off the pattern.
To make the card a little different, I've used the debossing method by using the folder on the reverse side. Position the folder just above the scored line. This is a brill folder because you can use it from the top, bottom or sideways, which is the way I have used it and the pattern looks right each way. The Cuttlebug logo is now underneath.

Run through the Bug - Sandwich : A/ B/ Card in folder but not wrapped round/ B
Your base card now looks like this - after I had added another line.

Next for the embellishment - Cut 2 different size hearts
Sandwich: A/ B/ card/ Die -cut side down/ C
Now to emboss these
Sandwich: A/ Die (cut edge up) with card inside/ Tan Mat and Shims (you know how many your machine will need)/ 2 B plates
Run through the Bug

Leave the card inside when you have embossed - turn over and with a scoring pen run round the edge again.

and here you will see why I do this. The embossed edge is now super defined!


To finish my card I have made initials with my Harmony Alphabet and made a flower embellishment with added beads and ribbon


The topper for my card


and my finished card.
I love the D'vine swirls folder and when you deboss the pattern it gives a completely different look. I'm not sure whether I like it embossed or debossed best -How about you?

I have been making Wedding cards this month using my Cuttlebug - you can see them on my blog. Why not check them out - with the Bug you can make stunning cards!

Friday, May 15, 2009

Scrapbook Bubble Wrap Envelopes

Here is a video making bubble envelopes for shipping items in out of scrapbook paper. Much nicer than the tan/yellow manila type. Doesn't everyone have some old scrapbook paper that you bought thinking would be great and never used it??!! I know in my stash I do...so this is a great way to use some of those up!

These turn out really cute and the recipient will surely love to receive it!

Please make sure to check out my blog at Lilacs and Lupines for other ideas!

Hope you enjoy the video:


{{cheers}}
~Karen

Wednesday, May 13, 2009

Mr. Crabby Pants "Under Water"


Here's a card using a technique that makes your image
appear that it is under water.

Visit my blog for more fun!

Making Flowers with a Scallop Circle Punch

Now don't all faint but I am actually posting a tutorial here, about time as it is my blog lol

This is just a quick video showing how you can make really cute flowers very quickly using a scallop circle punch, you can visit my Scrapping Away blog for more photos

Also if you have a go at the flowers yourself please leave a comment with a link to your creation as I'd love to see

Julie Allain :)


Friday, May 8, 2009

Origami Box with Wrap Lid

This is a tutorial for UK A4 squared but I have tried to explain the principle so it can be applied to any size.


CLICK ON IMAGES TO SEE FULL SIZE


Instructions in Brief
Make the box first - from a square of good quality paper.
Make the wrap from good quality, heavy weight card.
Wrap length:
is the same measurement as the paper used to make the box.
Wrap width:
is 20mm (7/8") wider than the finished box width.
Score lines on wrap:
1) Mark the centre of the wrap (lengthwise).
2) Measure the height of the finished box.
3) Mark the box height measurement - half either side of the centre point.

If you want to colour tint, stamp or round corners of the wrap - do this before attaching to the box.

Add panels or 3D embellishments after attaching to the box.


Another example - 'Dragonfly Joy'

Here I added decorative panels to the top, sides, inner lid and base. I stamped onto the black card with VersaMark clear ink and embossed with clear embossing powder.

This was a 'New Technique Challenge' on Splitcoaststampers.Here's the link: http://www.splitcoaststampers.com/forums/showthread.php?t=410418

For more examples of origami boxes check out my January postings and Splitcoaststampers Gallery - (there are some fabulous boxes here!)

These boxes are quick to make which leaves lots of time for the fun bit - decorating!

Thanks for looking!

Elaine
http://magic-boxes.blogspot.com/

Thursday, May 7, 2009

A Mothers Day Gift (and Quilling Tutorial)

A craft project for all skill levels, a quilling version for more skilled crafters and a none quilling version, for mums and dads who are possibly making a mothers day gift with kids, simple enough even for children wishing to create a mothers day gift to give to mum or gran on mothers day.
Shown below is the quilling version of this Mothers Day Gift created with folded quilled roses , visit Pages Craft blog for images of the none quilling, silk flower version of the topiary Mothers Day Gift.

Supply List

Several sheets of newspaper or flyers

Container for base of topiary

Stem for topiary (I used an old wooden spoon)

Flowers if using silk flowers then any smallish ones will do

For quilling the roses

You will need the slotted quilling tool and quilling strips either purchased or home made quilling strips (see the how 2 )

In addition you will also need

White glue ,hot glue and gun,craft paint in complementary shade to flowers ,a few bits and bobs to decorate the finished mothers day gift eg. gift tags ,narrow ribbons raffia sphagnum moss …..what ever takes your fancy or you can add fringed grass (see quilling Tutorial)

To find out more about this Mothers day gift and quilling tutorial visit Pages craft blog
for other DIY gift and quilling tutorials check out Pages from the Heart Gift Books
follow the site map to the Tutorials page

Tuesday, May 5, 2009

Ribbon Flowers


Making easy ribbon flowers for your cards or scrapbooks.
Thanks for watching!

Saturday, May 2, 2009

Girls "secrets purse".

All little girls love somewhere to keep their secrets and messages from friends, so here's a step-by-step to make a little purse to keep them safe. Similar to the men's wallet, only easier and prettier!

Ok, firstly cut a piece of card 8 x 5 inches.


Next, pick two pieces of patterned paper. Here i have used the "Wings" patterned paper from the Angelique Collection by Prima.


Now cover both sides of your piece of card, remembering that one side will be the inside of the purse, and the other the outside. Place your covered card in front of you, inside looking up at you..

Mark your purse folds with your scoring tool at the measurements shown, for a larger image, please click on the picture.

.
I find this a good time to give the front some decoration. All i have done here is used some lace, eyelets, distressed an inked the edges, added some fibres, a bloom with a fabric rose, and finally the word "Secrets". As you can see, i have used a simple Velcro dot for the closure.

.
Flip it over, and you are ready to do the inside. I've added a little lace again here already.....
.
.
Now you need somewhere to hide those secrets. We are going to make a simple pocket, but you can use a pre-made envelope if you wish, maybe even a pretty little organza bag or similar?
.
For this pocket, cut yourself a strip of card 8 inches long. The top inch is for the pocket lid, and you can see that i have added some flaps at the side of the bottom 3 1/2 inches. The dotted lines are score lines which will be folded...
.

Cut some patterned paper the same shape, and cover the card. Score the fold lines..

.
Fold this pocket over in half, gluing the tabs inside to make the pocket. I have used a border punch on the flap, and some fibres and a ribbon and brad closure to pretty it up.


Add some more decoration if you wish. My eldest loves music, so i made a simple LO involving a handmade miniature wooden recorder, and a scroll of music. Instead of this, you could think about having a few journalling pages there, or a notebook to write the secrets on.
.
.
Just be careful of making the inside too bulky or it will not close. If you do envisage a bulky load inside, just slightly increase the distance between the the fold scorelines..
.
That's it finished! One purse fit for a princesses secrets. :)

.
Thanks for looking, i hope this has been useful and i look forward to seeing what you do with it.